Facebook Business Manager, now officially known as Meta Business Manager is an essential digital marketing tool that helps one create and manage business assets like ad accounts, pages along with Instagram accounts and product catalogs from the same place and make sure that the right people have the correct access based on their roles.
But since you’re on this article, you must already know this and have an account you want to verify.
So let's not waste much time and get started, shall we?
To answer your question, you must first understand why you need to verify your Facebook Business Manager Account.
This is important information as it will help you take full advantage of your verified account.
Why is Facebook Business Manager Account Verification Important?
The answer is simple.
Verifying your account helps legitimise your business.
What are the perks of verifying your business on Facebook?
Once you verify your Facebook business manager account you get access to a variety of perks and products, essential to further grow your business. Some of these perks include access to developer features, meta-business partners and complete access to Whatsapp business API.
Some also believe that verifying your business might be the potential solution to having your Facebook advertising accounts terminated for no reason.
Although this isn't a verified solution, it is a good enough reason to take that step and get your Facebook Business Account verified anyway.
Now to answer your main question.
How do you verify your Facebook Business Manager Account?
To verify your Facebook business manager account in India, you will require the following documents:
Legal Name Verification
- Business Registration (BR)
- Company Incorporation Certificate
- Tax/VAT Certificate
Address Verification
- Bank Account Statements
- Utility Bill (Electricity/Phone) for registered business
Here is the Official list of Documents required by Facebook, given country-wise for better reference- https://en-gb.facebook.com/business/help/159334372093366
Steps to Verify your Business Manager Account
- Head to your Business Manager Account and Select your Business Account.
- Go to Business Settings and click on ‘business Info’. This page will show you your business details and verification status. Your verification status should be unverified.
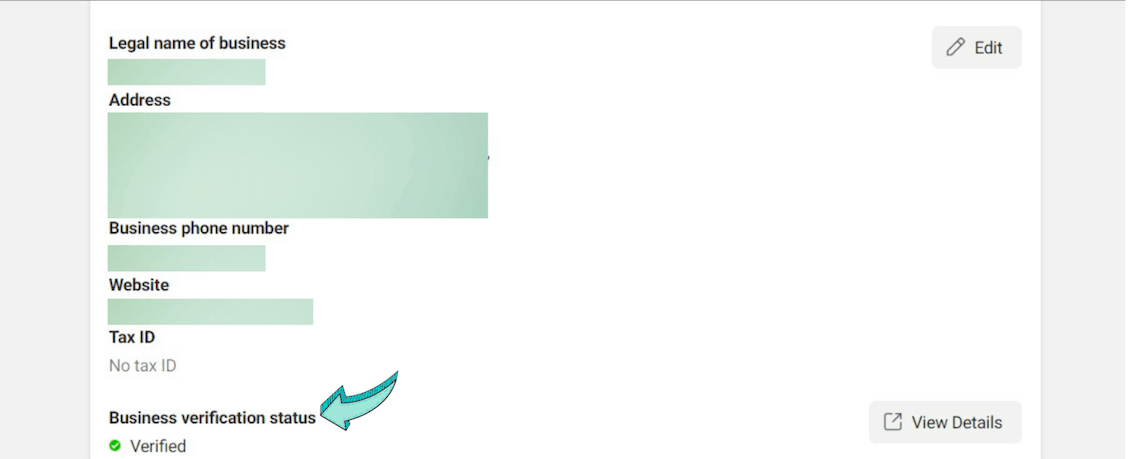
- Click on the ‘view details’ button and it will directly lead you to the “security center” section. There, click on the “Start Verification’ Button.
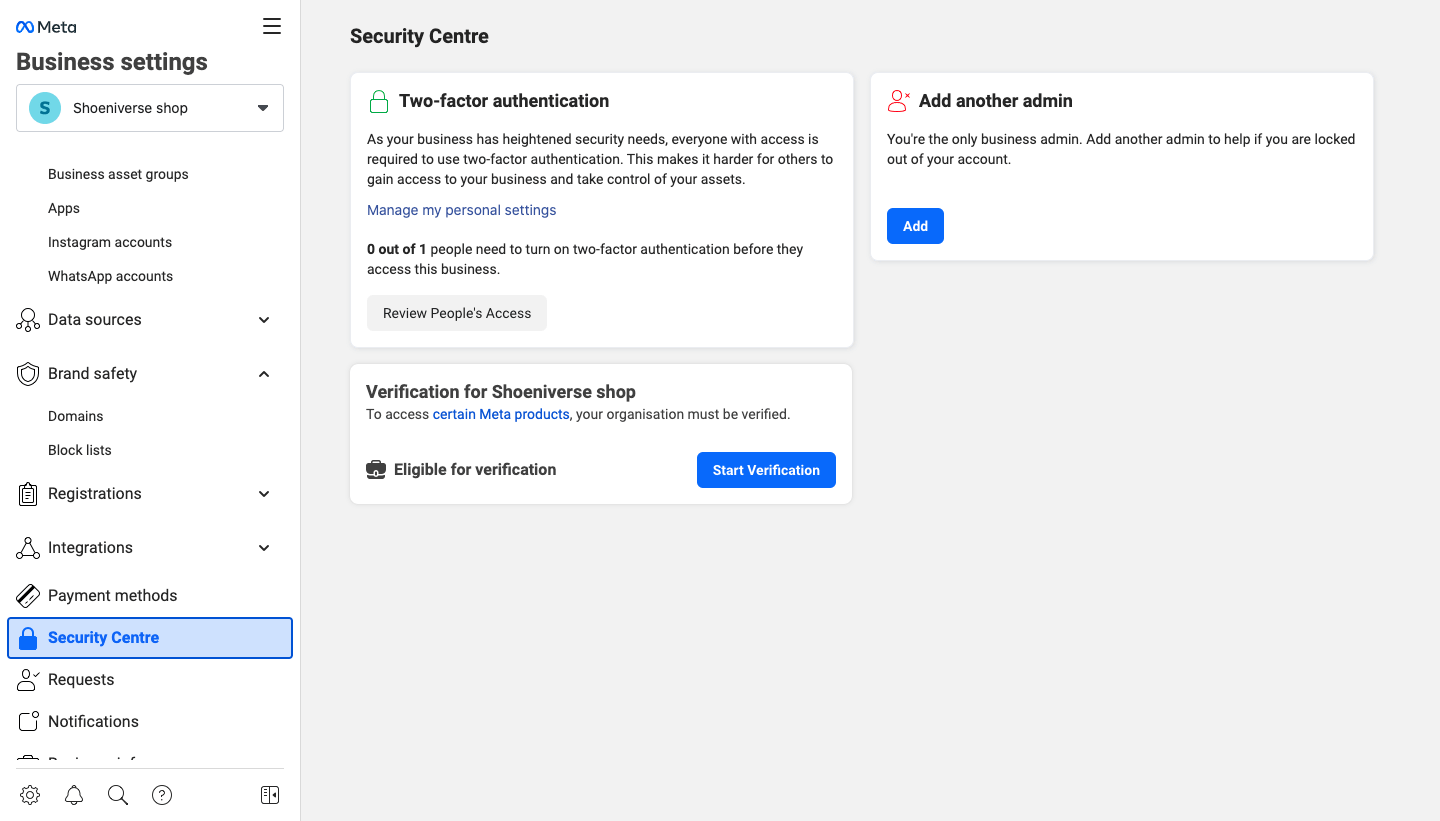
- Scroll down to find out how to activate the start verification button if not available.
- Tap on the “Get Started” button on the next page
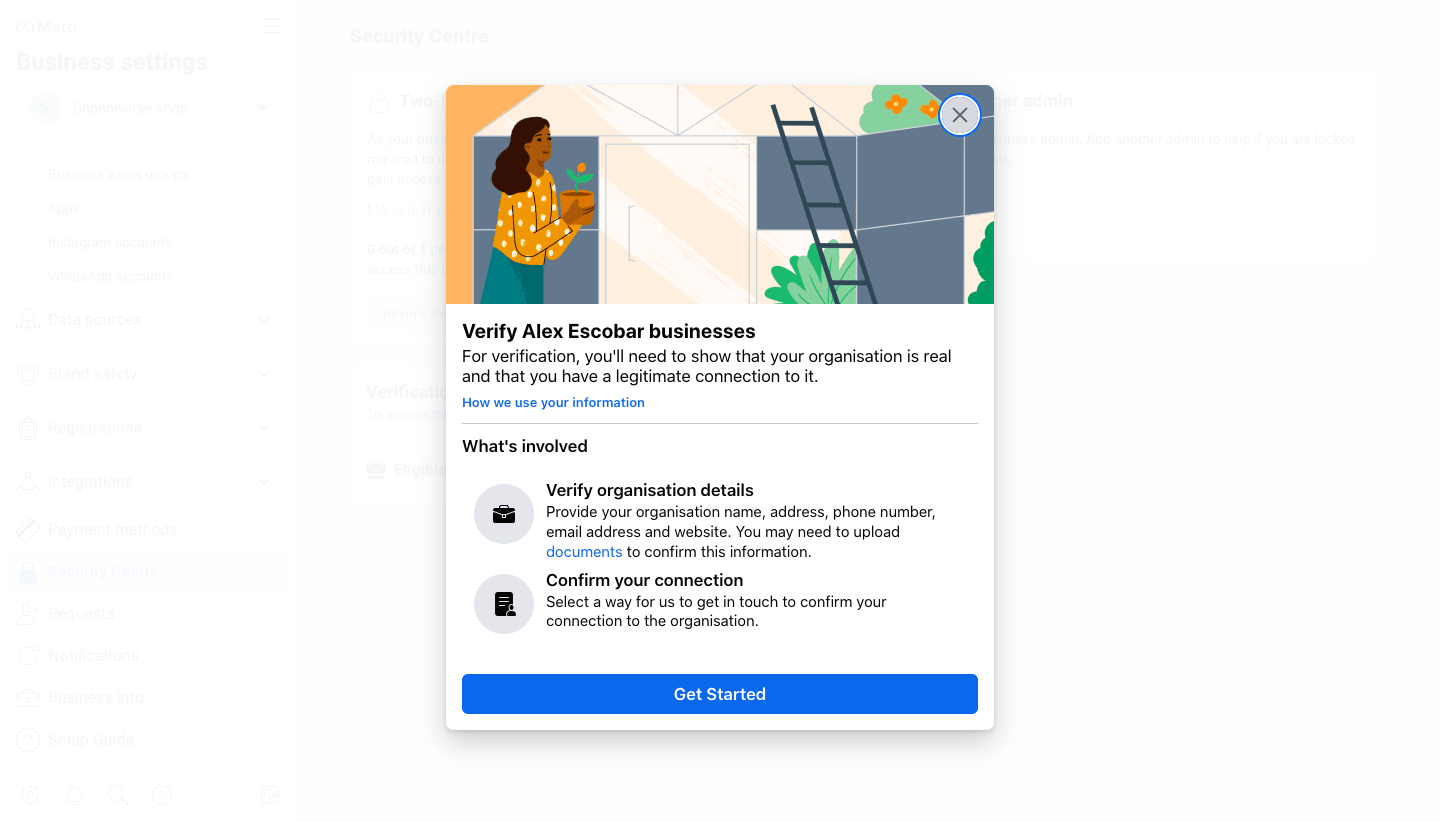
- Select the country your business is based in
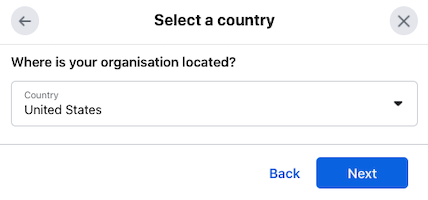
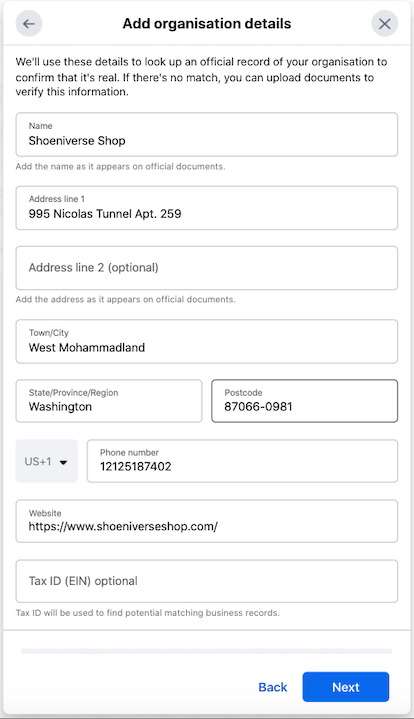
- Fill in your Organisation Details. Make sure all your details are exactly the same as your legal document.
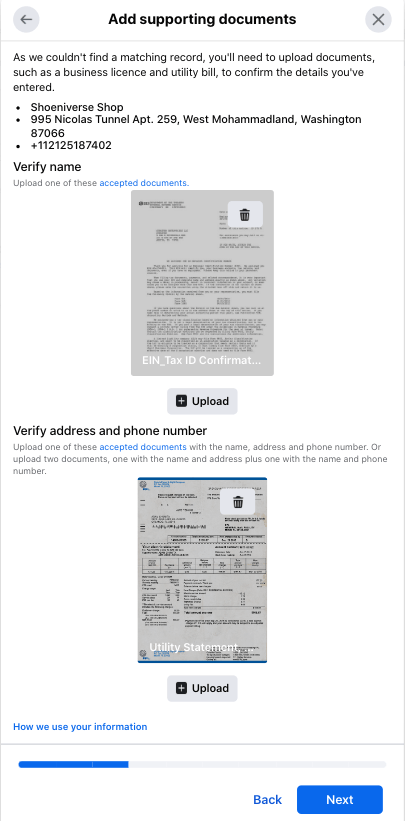
- Upload supporting documents
- Submit and confirm your contact number.
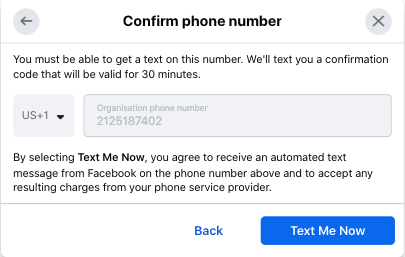
- Enter the confirmation code sent to your number and finish your verification process.

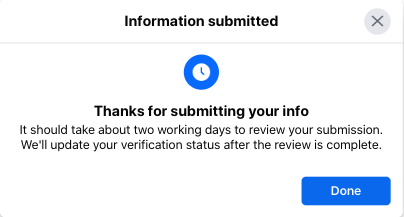
And that's that. Congratulations. Your business should get verified between 2-7 days.
What if my Business Manager Account does not get verified?
It isn't uncommon for a business to not get verified in one go.
If that is the case with you, do not worry. Try again. Facebook will tell you what went wrong.
Once everything goes according to Facebook policies, your business manager will get approved.
Certain businesses cannot be verified on Facebook or WhatsApp business API. These include businesses from pharmaceuticals, gambling, downloadable software, weapons, alcohol and several other sectors. The mentioned businesses cannot be verified due to ethical problems.
Common Reasons for a Business to not get Verified:
There are three probable reasons for your Business Manager Verification to get rejected:
- If your Legal Name and Address Proof have a different address.
- Your Business Legal Name is not in the website URL or the footer of your website.
- If your business email address was not used for the Facebook Business Verification process.
What if the Start Verification Button is not clickable?
Another query faced by many businesses attempting to Verify their Facebook Business Manager Account.
If this is an issue you are facing. Do not fret, we got your back.
Here are two foolproof ways to fix that ‘Start Verification’ button for Facebook Business Manager Verification.
Connect your account to a Dummy App:
- Go to the 'Facebook for Developers' Page and log in with your Facebook Business Manager Account.
- Click on the "Create App" button.
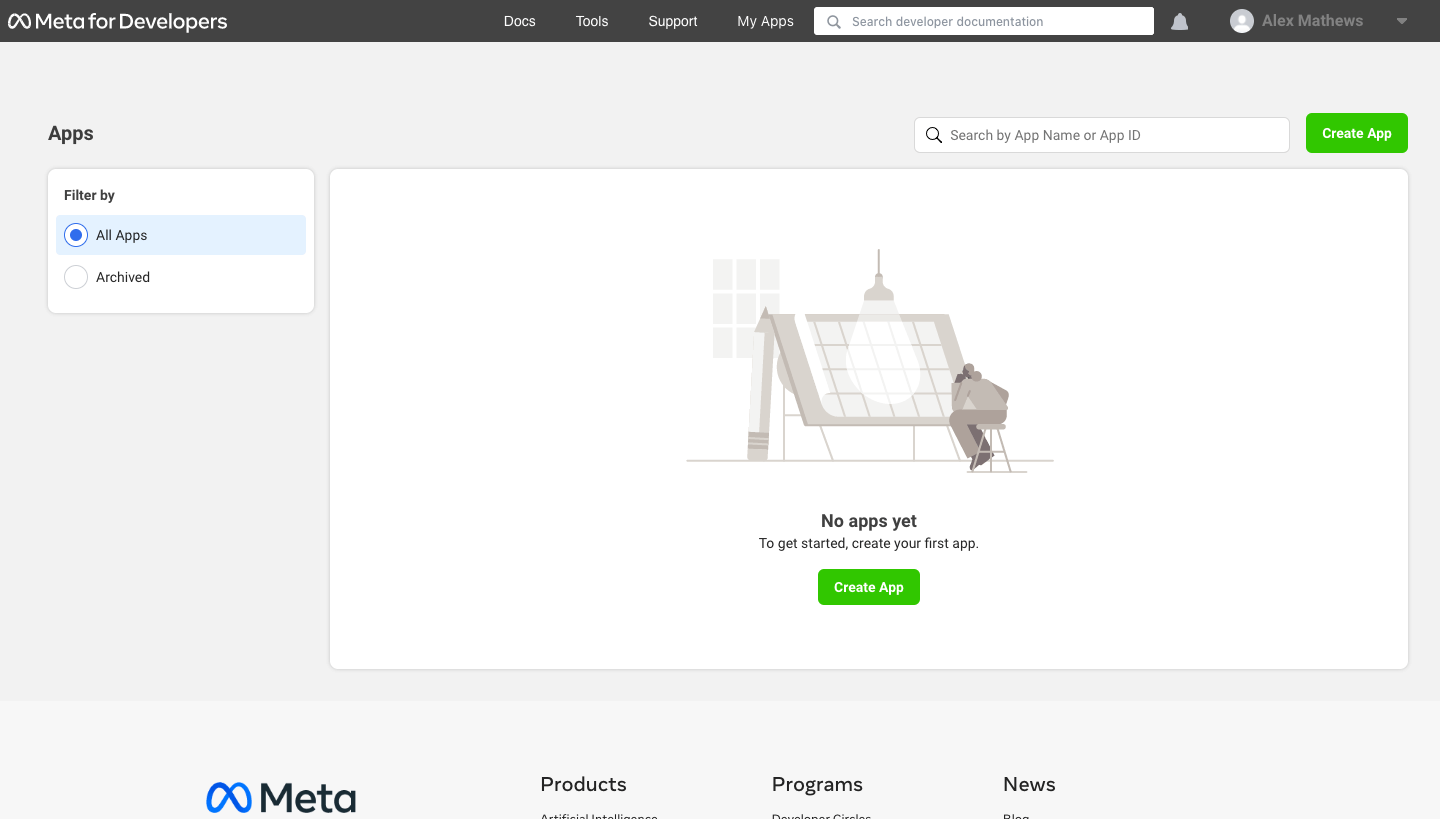
- Click on “Business” in the app type section. Then tap “Next”.
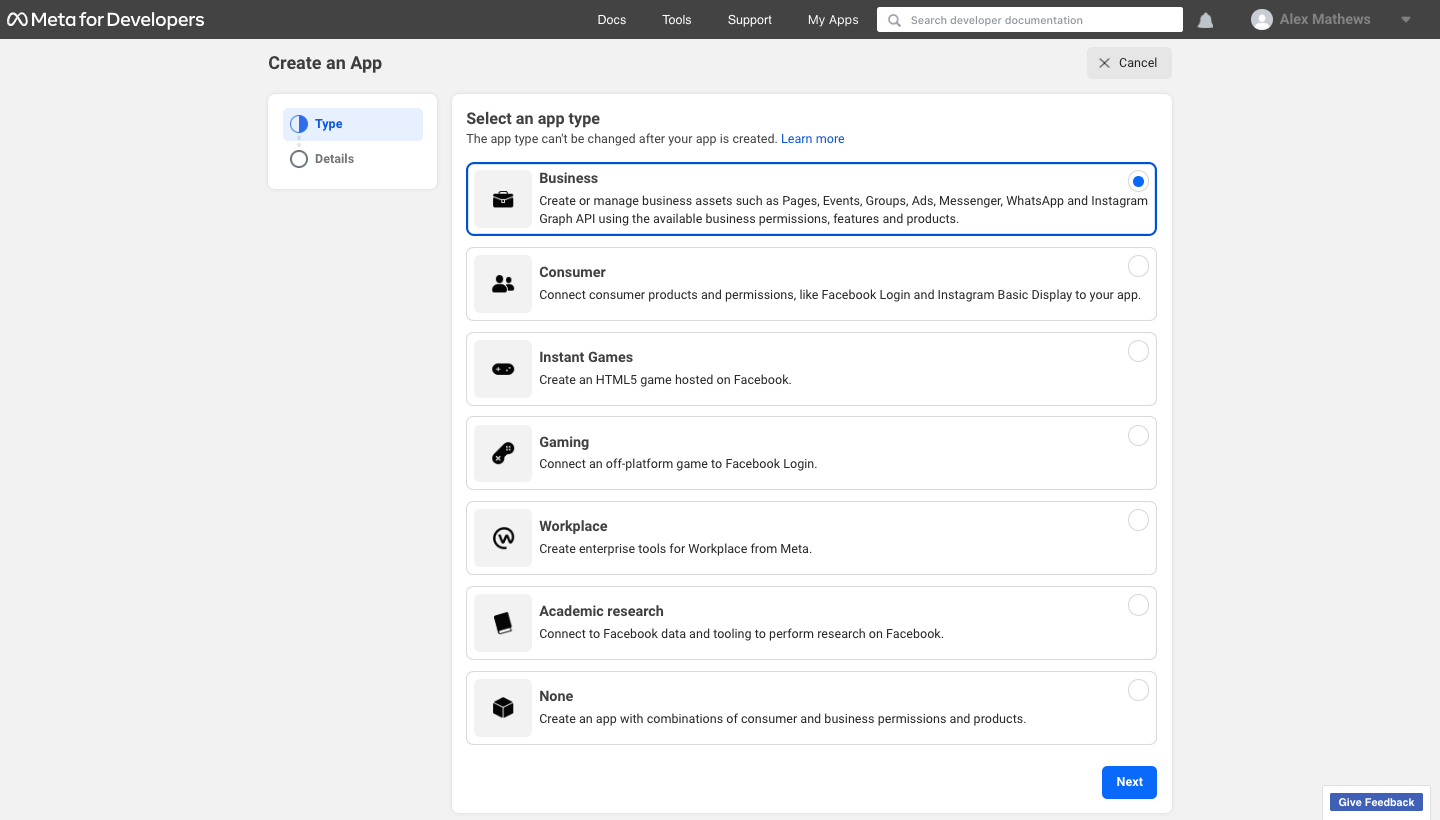
- Head to the Details sections and fill in your app name, contact email and business account. Now click on ‘Create App’.
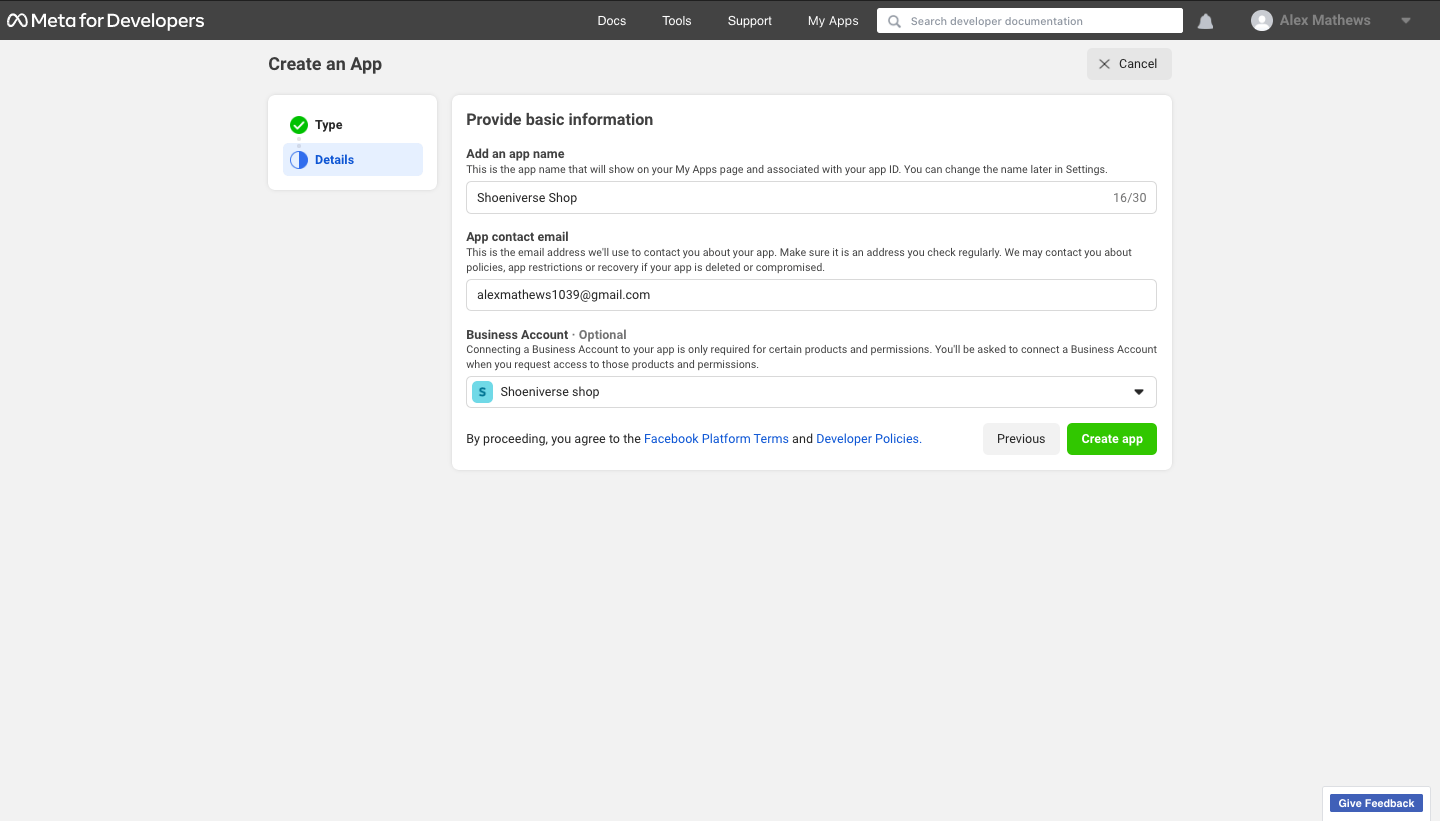
- Copy the App ID to your Dashboard.

- Head back to your Business manager settings and navigate to the "Apps" section in the left side panel.
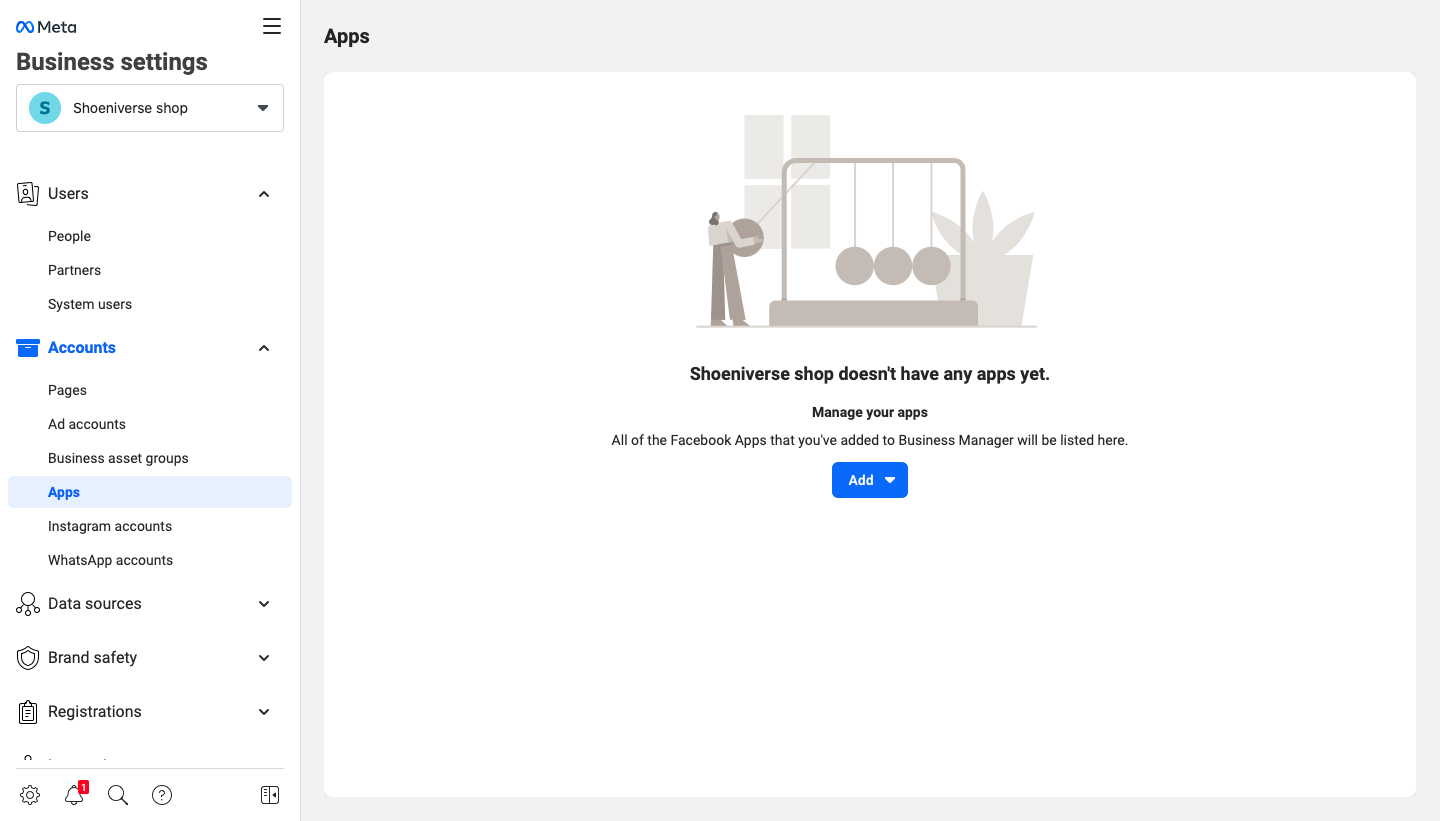
- Select ‘Add’ and click ‘Connect an app ID’ and Paste the copied App ID in the section that pops up.
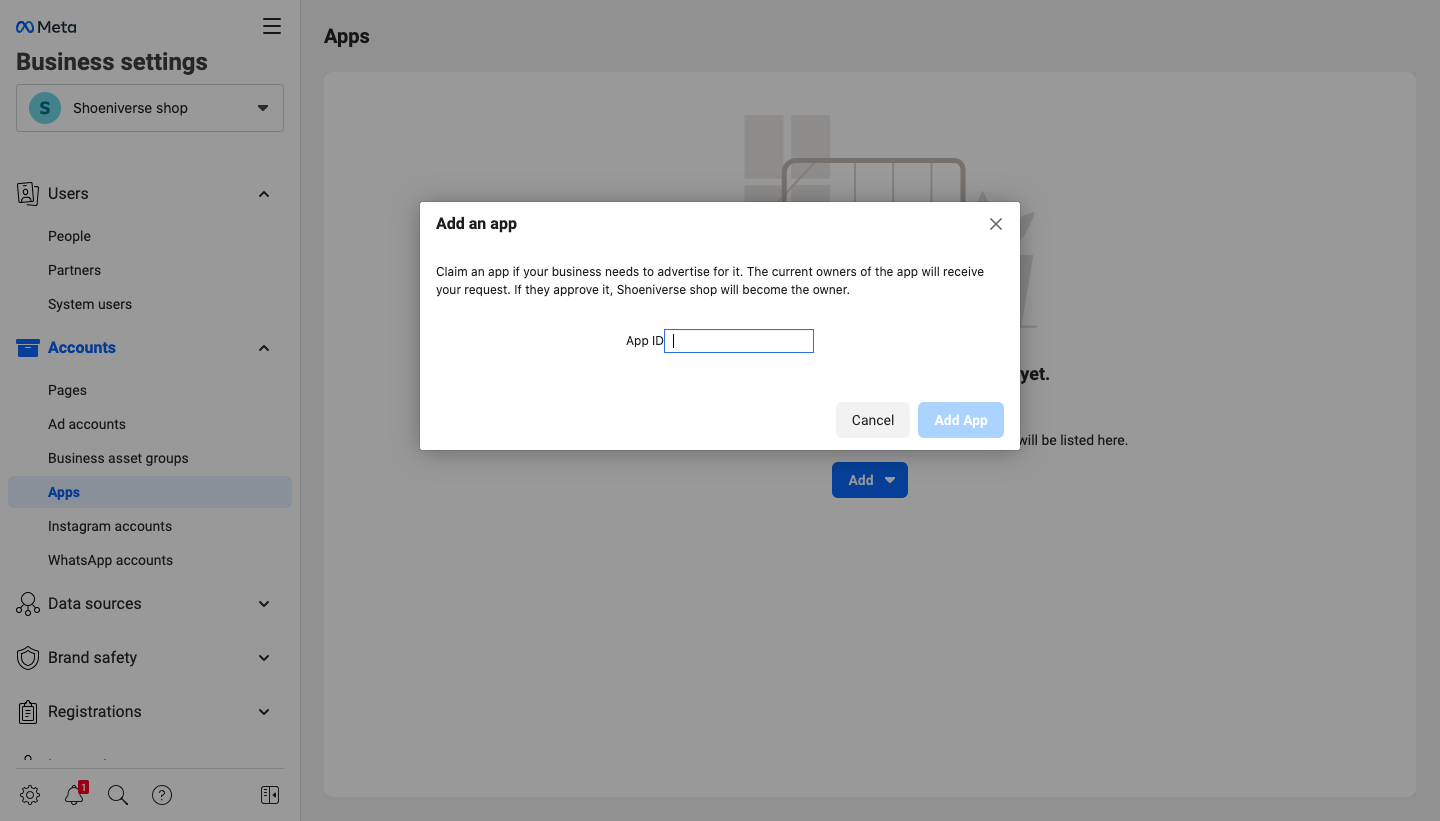
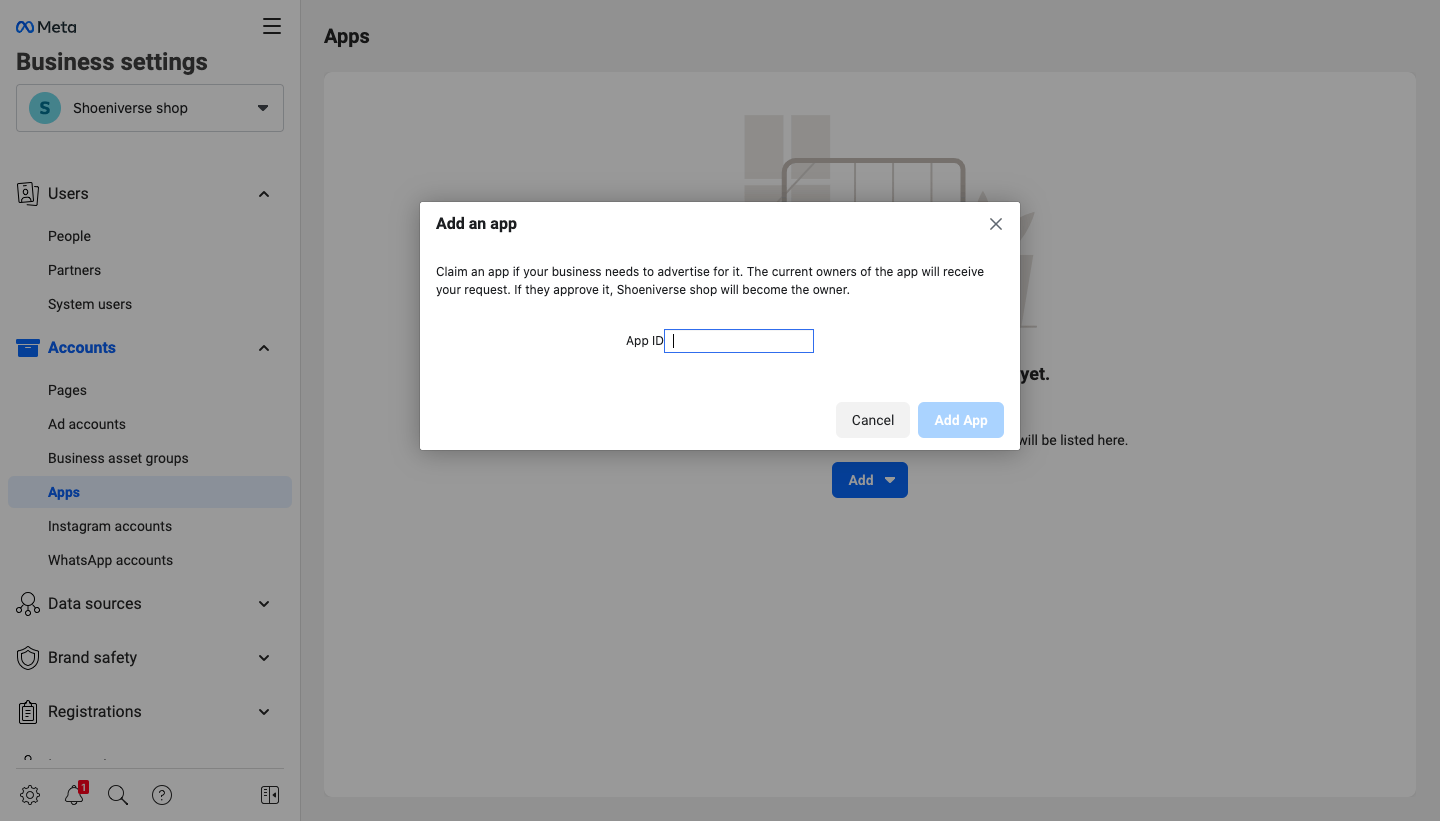
And Voila! Your 'Start Verification'' button is now enabled.
Go back to the "Security Centre" section in your business settings and get your verification process started.
What all can you access with a Verified Facebook Business Account ?
After you have completed the verification process, there is a wide range of advanced features that you now have access to. These features can help your business grow.
You can create engaging ad campaigns for social media and also sell your products on Instagram. You can access the developer features, meta-business partners and also the WhatsApp Business API.
WhatsApp as a platform has a high engagement rate and by using it effectively it can help your business excel.
Here is where Engati can help.
Partner with Engati and 360Dialog:
- Register with 360Dialog
- Get a code on your registered email address
- Once you get the code, you will get an option to ‘continue with Facebook
- This will ask for the registered Facebook account and manager page that needs to be verified
- Confirm the details filled in earlier and then add your Company Name as stated in the Business info section and save.
- Once this is done, you can go back to the Business Settings page and refresh the page.
- Now when you head to the “Security Section”, your ‘Start Notification’ button will be enabled.
Partnering with a Business automation company like Engati will help you manage your business on more than just Facebook and WhatsApp but also on the entire journey of business process automation. Check out Engati’s Website to know more.
Disclaimer
It is important to remember that your Facebook Business Manager account verified is NOT the same as getting a blue tick on your Facebook Page.
Facebook Business Manager verifies your business and provides more tools to help it grow, while Page Verification only verifies the authenticity of the individual or brand in concern.
We hope that this article was helpful to you in every way possible.
If yes, here is another blog on How to get a Green Tick on WhatsApp.


.jpeg)


