Taking your first step towards online commerce or deciding to take your business online; Shopify is the right place to set up your eCommerce store that covers everything. You can build your online marketplace from scratch and take it up to social media, manage shipping, payments, and all in one place.
Once you have your plan and products in place for an eCommerce marketing strategy, you need to take it to the execution level and start boosting your revenues and converting visitors into customers. However, you will need a Shopify store to let the eCommerce game begin.
The following are 11 simple steps to set up your online store on Shopify:
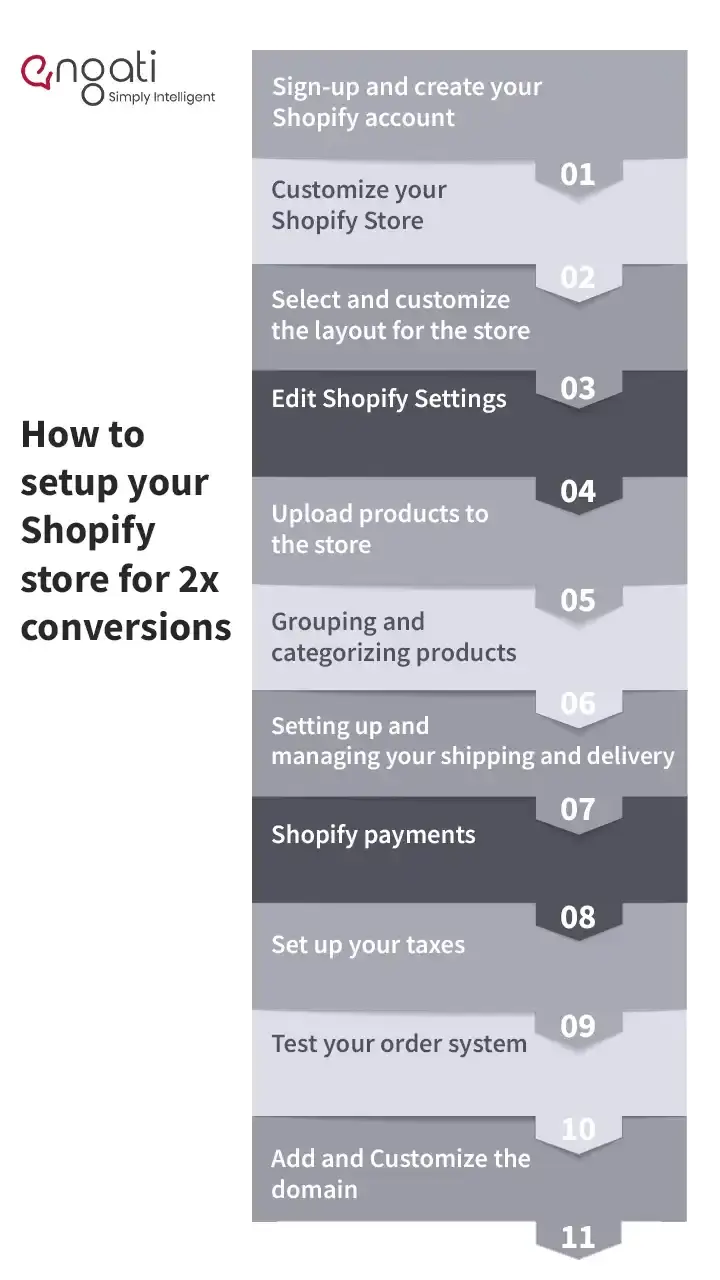

Visit the Shopify homepage and the system will redirect you to your geographical location-specific domain of Shopify like Shopify.com or Shopify. in. Click on the "try for free" button or enter your email address to get started. You will be prompted to fill in some basic details, where you'll also have the option of adding/creating a store name. You need to be careful while creating/selecting a name for your Shopify store as it should sync or align with your business or its offering. Because if you put a vague or unavailable name, Shopify might ask you to change the Shopify store name. It’ll also ask you to add the physical address of your business as a protocol.

You'll be taken straight to your store admin screen after you've signed up. You can now begin customizing your store, uploading products, and configuring payment and shipping options.
Shopify's administrator page has all the information you'll need to get your online marketplace up and running. You will be able to add items to your marketplace from this page. You can also include services, files, and any other digitally downloadable items.

Selecting a look or theme for your Shopify store is as crucial as decorating your bricks and mortar store. The aesthetics of your store communicate and reflect the product offering and the ethos of the business. Shopify has its own official theme page where you can select from the range of paid and free themes. You can make changes to these themes depending on the permissions and can reach out to Shopify experts who can customize a theme for you with utmost ease. Always remember that aesthetics add value to your online store and can come in as a strong encourager for a visitor to browse through a pleasant great-looking store/site.
One of the most important aspects of using a theme is how well it is optimized for mobile use. According to recent statistics, over 52% of website users now access websites via mobile, making it critical for your site to be mobile-friendly. Because mobile optimization is also a key factor in search engine optimization, it's something you should pay close attention to as a seller.
Once you select 'Themes' from the left navigation menu on your admin screen. Your live theme will be displayed in a box at the top of the page, with two buttons in the top right corner. The first is "Actions," which allows you to make some basic settings adjustments. You can duplicate the theme using one of these options. We strongly advise you to do this so that if you make any changes you don't like, you can undo them and start over.
"Customize" is the second button. If you click it, you'll be taken to a page where you can manage your store's basic functions. This is an excellent time to play around with the settings and test out all of the features to see what your site is capable of.
You can alter and play around with the following things:
- Uploading logos
- Uploading slides to a homepage carousel
- Adding related item functionality to product pages
- Choosing how many items appear on each line of the collection pages
- Color schemes
- Font choices
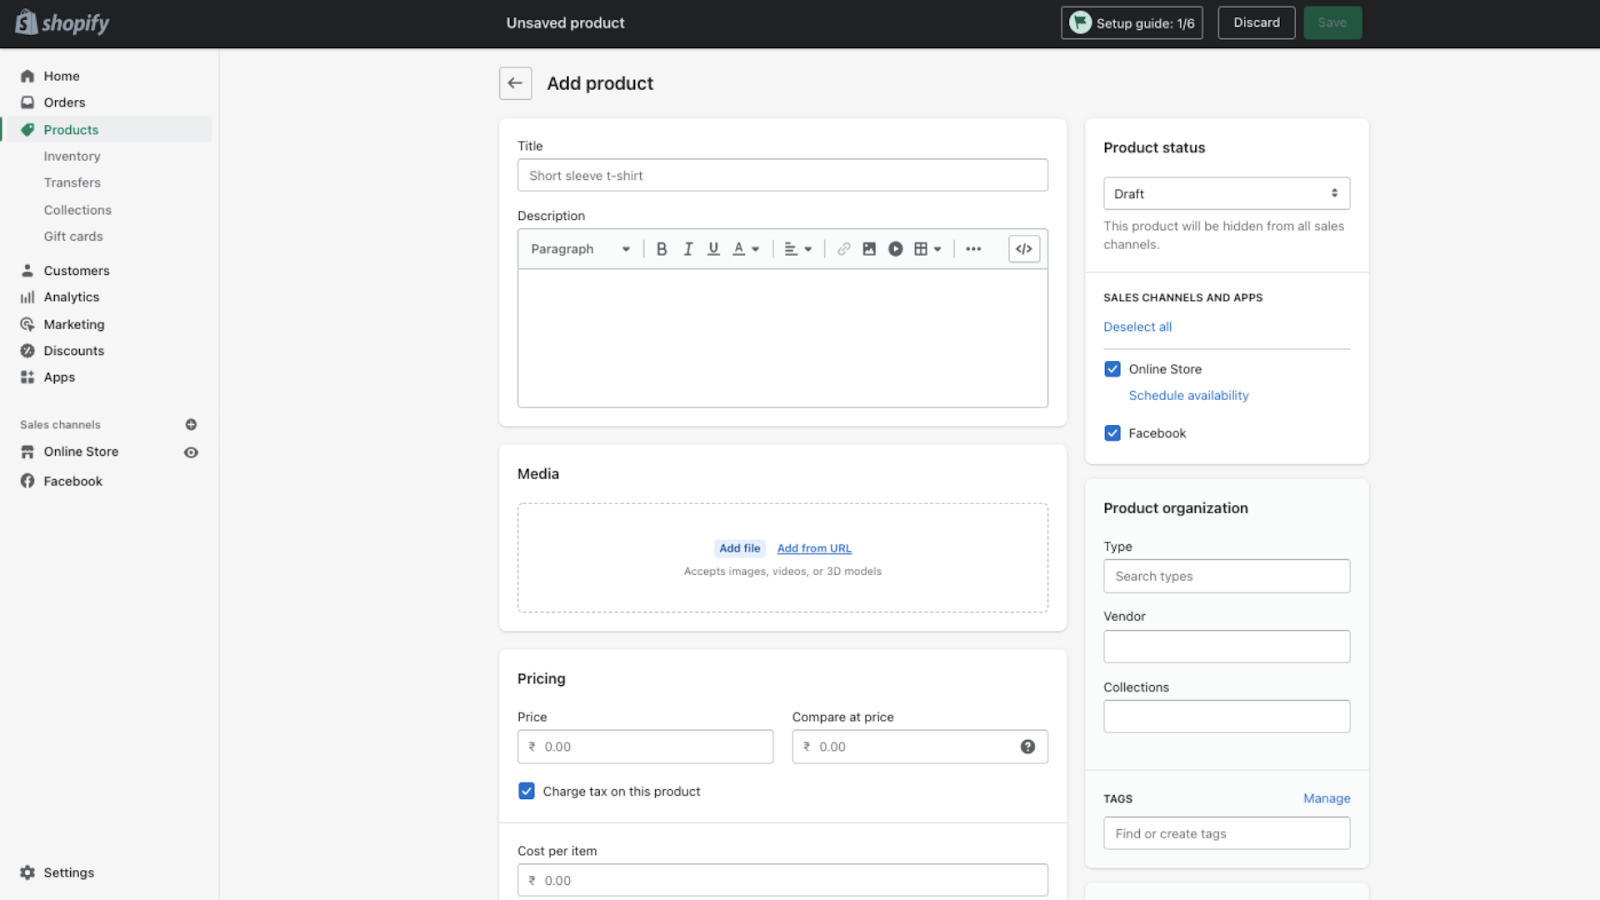
Select 'Products' from the left-hand navigation bar. In the middle of the page, you'll see a green 'Add a product' button. Fill in just as much information as you need about your products on the next screen. Pay special attention to the elements that will aid SEO, such as the name, description, and URL. Include as many details as possible to help customers understand your products.
This is the screen where you can upload pictures of your products. You can rearrange the images after they've been uploaded, so don't worry about uploading them in a specific order.
From the Products page in your Shopify admin, you can add or update information about a product, such as its price, variants, and availability.
You can use meta fields to add custom fields to your product pages if you want to save specialized information or files for your products. If you have an Online Store 2.0 theme, you can use the theme editor to add references to your product meta fields.
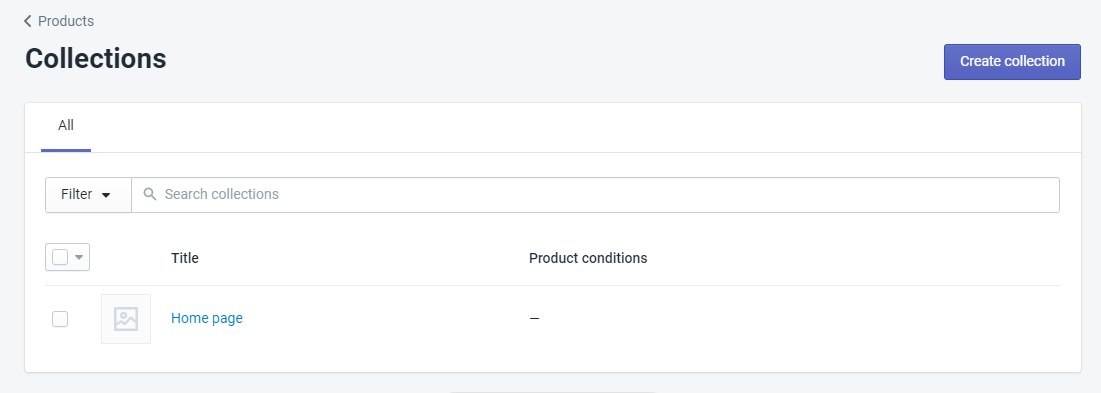
Make sure all of your products are properly classified for your customers' convenience. For example, if you sell more than just apparel, you should list the sex, age group, or other relevant information that you offer apparel. This option is also accessible from the same admin page, beneath the products dropdown. You don't have to add products to collections one by one, though you can. You can also set up your products so that they are automatically added to certain collections if they meet certain criteria. Typically, your collections will be displayed on your homepage and in the navigation bar. Customers will be able to find what they're looking for without having to browse your entire catalog.
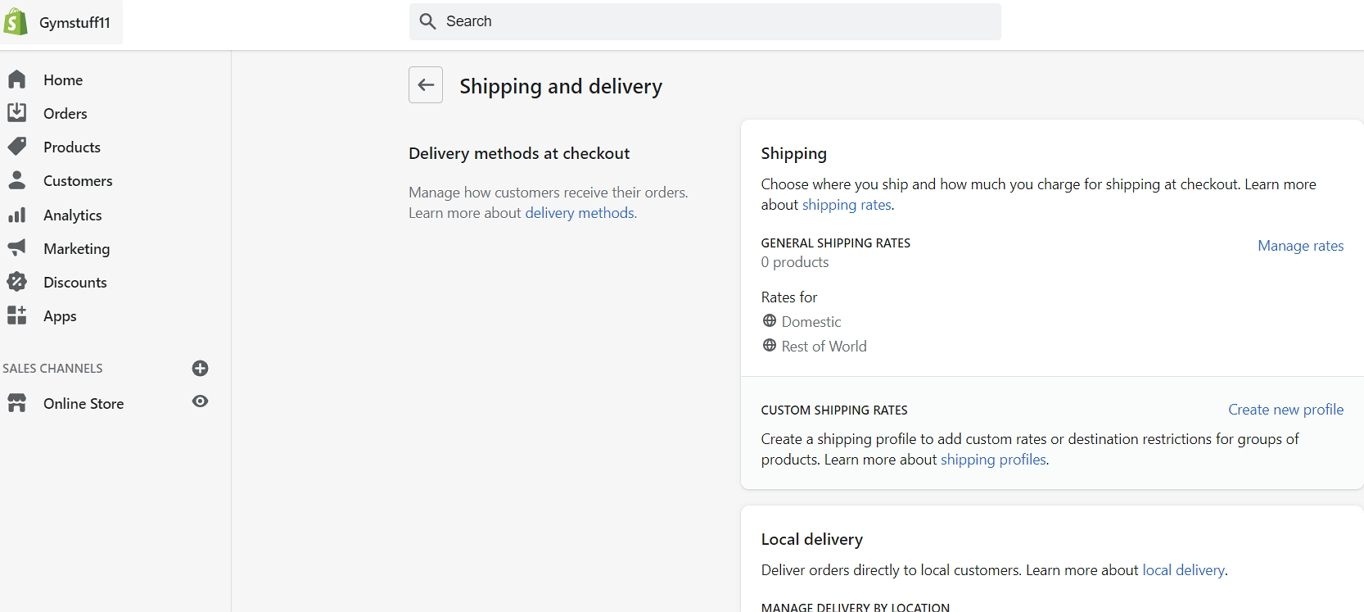
The next step is to create your shipping method once you're sure about how shipping works. Shipping, local delivery, and local pickup need to be seen and customized properly.
If you deliver your products using shipping carriers, you can add flat or calculated shipping rates to your general shipping profile that apply to all of your products, or you can add products to custom shipping profiles with their own shipping rates.
You can set shipping rates using geolocation apps within each shipping profile for greater control over your shipping costs for businesses with multiple locations.
Set up the pickup and local delivery if you want to provide customers with local delivery options for receiving their products.
You can accept payments from your customers via your website using a payment gateway (Settings -> Payments). It's important to look at the price and commission rate, but it's also important to look at the features they provide. Payment gateways are not all created equal. The following are some things to think about when setting up your payment gateway.
Fees for Transactions
Some payment gateways keep a small percentage or flat fee (or both) for allowing you to use their service when you make a payment. Compare the two based on the amount of money you expect to make.
Types of Cards
You must know what types of cards your chosen Payment Gateway accepts. VISA and Mastercard are accepted by all, and American Express is accepted by the majority.
Checkout Offsite
Some payment gateways will process transactions on their own servers, using their own forms. This means the customer is taken away from your checkout and directed to your payment gateway's payment form. Once the customer has successfully paid, they will be redirected to your confirmation page. This gives you a little more control over the checkout procedure.
On top of Shopify's own transaction fees, payment gateway transaction fees are added.
Ensure that all of your information is correct for tax purposes, as you will need to include this information in your products. Make multiple copies of your data and keep track of your investments, purchases, and other relevant information.
Your customers will also want to know if any additional taxes are included in the price. You can mention Shopify taxes and international shipping charges for each product under the products section to ensure transparency, and you can also specify whether they are included in the product's cost or incur an additional charge.
Shopify has a feature called the "Bogus Gateway," which allows you to test if your order system is up and running.
To put it another way, place an order with real payment information, just like you would on any other e-commerce website, to ensure that your payment and ordering systems are up and running and working properly. Proceed to purchase an item; however, the trick is to cancel the order well ahead of time to ensure that your money is refunded. The next step is to check your order system from the back end of your payment gateway to see if everything is in order.

Having a unique domain name is one of the most important parts of e-commerce. A domain name can be purchased through Shopify or an external hosting website. While Shopify domains are only 2-4 dollars more, you may have to redirect the DNS on your own if you use an external domain. If you decide to go ahead with an external domain, make sure to update your Shopify store's information. This can be accomplished by returning to your Settings and selecting the Domain tab. To add a domain, go to "Add Domain" and click it. After that, you'll need to make changes to the existing DNS records.
The following are a few important factors that you need to consider before creating a store on Shopify. Before building an online store with Shopify, consider comparing alternatives as These factors need to be in place and strategically defined and put together in the marketing plan.
- Knowing and evaluating eCommerce business models
- Find the right products to sell
- Find your product source
- Calculate your product pricing
- Find the right eCommerce platform
- Find a good shipping partner
- Create a marketing plan
Rosetta helps you to translate customer intent into eCommerce growth and increase revenue per visitor. It can also send product recommendations with real-life data touchpoints on various platforms to increase traction on your Shopify store. Rosetta can also allow you to understand and analyze what consumers like and why, so you can optimize promotions, product development, and inventory management.
Growave can help you pep up your referral and promotional programs. With Growave you can create a points program, and reward with discounts, in-store cash, free products, and referral programs. It helps you leverage reviews, UGC marketing strategy, wishlist reminders, and personalized emails with powerful buying triggers to boost sales. At the same time, shop owners can showcase review rating-rich snippets in Google search results and increase their market penetration.
Engati's AI-enabled platform can help you manage conversations across channels in a one-view inbox. You can get more store visitors by automating engagements on Facebook, Instagram, and other social media platforms. Re-targeting customers by setting up customer reactivation campaigns, feedback, and referral campaigns on Engati's Shopify app is really easy. By automating your Shopify store, you can acquire customers with pre-sales support across channels.
Mason's mode magic can help you grow your online sales on autopilot. Shopify owners can automate away the strains of running Flash Sales, Clearance, Stock Updates, Bestsellers, and more. You can leverage vital analytics and grow your revenues exponentially. Nevertheless, you can unlock on-brand banners, badges, announcement bars, etc.
Shopify owners can sync all their Shopify data with a single click and an integration that allows them to sync historical and real-time data, so they can stay on top of every interaction people have with their site. You can send emails and SMS based on customers' latest shopping behavior, products they like, and even when they're likely to buy next. You can also benefit your business with dozens of built-in automation, that are fully customizable, like welcome emails, happy birthday, or abandon the cart.
Download our exclusive ebook for free! (Worth $199)

![A complete guide to setting up your Shopify store [for 2x conversions]](https://cdn.prod.website-files.com/5ef788f07804fb7d78a4127a/6297443141f49e354fc76c60_setup-shopify-store.jpg)


